Rebuilding 1976 MG Midget
By Gene Lucas
Back in the early 70's 3 of us drove a 1972 MG Midget to Florida 1 winter.
 The MG Midget was an early low end sports car that MG introduced to America.
It was a 2 seater that had typical British sports car feel. With rack and pinion steering,
tight close shifting 4 speed synchronized transmission it was an instant success in America. The
Midget got an unheard of 40 MPG on the highway, with an 8 gallon gas tank you could
travel 300 miles on a tank of gas. At 35 cents a gallon you only spent 3 bucks
for a tank of gas. With that in mind you can see the lure for 3 college students in the middle of
an Illinois bitter winter packing 3 very small duffle bags in the trunk of a 2 seater
car and heading south.
The MG Midget was an early low end sports car that MG introduced to America.
It was a 2 seater that had typical British sports car feel. With rack and pinion steering,
tight close shifting 4 speed synchronized transmission it was an instant success in America. The
Midget got an unheard of 40 MPG on the highway, with an 8 gallon gas tank you could
travel 300 miles on a tank of gas. At 35 cents a gallon you only spent 3 bucks
for a tank of gas. With that in mind you can see the lure for 3 college students in the middle of
an Illinois bitter winter packing 3 very small duffle bags in the trunk of a 2 seater
car and heading south.
 We played musical chairs every 250 to 300 miles. The driver would
hit the opening behind the seats. The person in the back would move up to the passenger seat to relax
a little before driving. The passenger would take over the driving duties. In the back you
would lay on your back with your legs up in your chin. Once we got far enough south to warmer
climate we put the top down and pulled the passenger seat up so one could sit down in the back.
The speed limit back then was 55 and no interstates! It took 24 hours to get down there and with our
lack of funds we did not stay any where on the way. I guess this tight quarters for 10 days is one of
the reasons that none of us have seen each other in 20 years. I think between all 3 of us we probably
had less than 100 bucks for this trip. The day after returning home the clutch went out of the car on
the way to work. So luck as usual was on our side.
We played musical chairs every 250 to 300 miles. The driver would
hit the opening behind the seats. The person in the back would move up to the passenger seat to relax
a little before driving. The passenger would take over the driving duties. In the back you
would lay on your back with your legs up in your chin. Once we got far enough south to warmer
climate we put the top down and pulled the passenger seat up so one could sit down in the back.
The speed limit back then was 55 and no interstates! It took 24 hours to get down there and with our
lack of funds we did not stay any where on the way. I guess this tight quarters for 10 days is one of
the reasons that none of us have seen each other in 20 years. I think between all 3 of us we probably
had less than 100 bucks for this trip. The day after returning home the clutch went out of the car on
the way to work. So luck as usual was on our side.
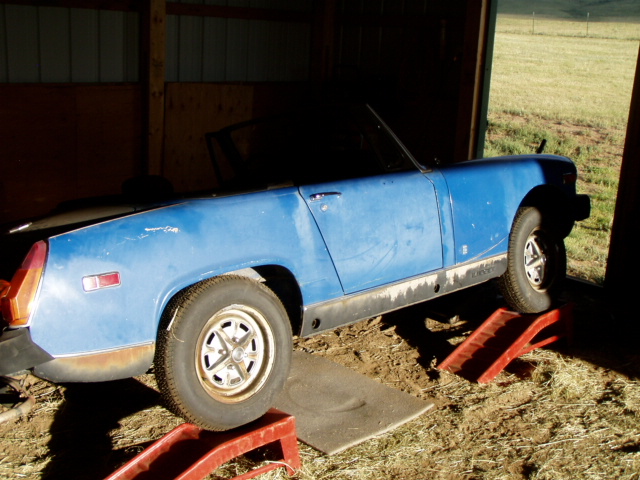
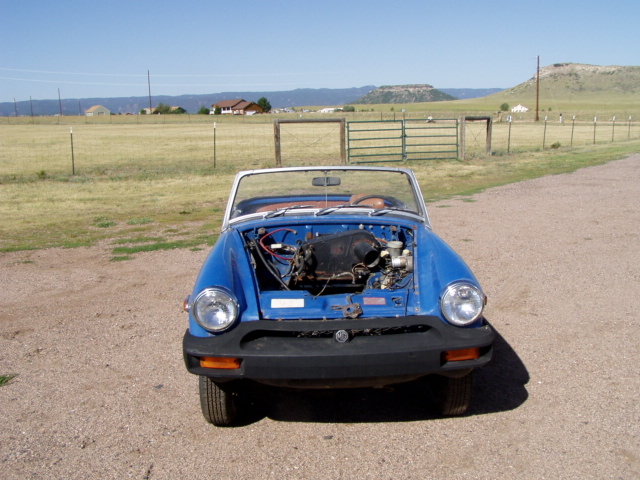
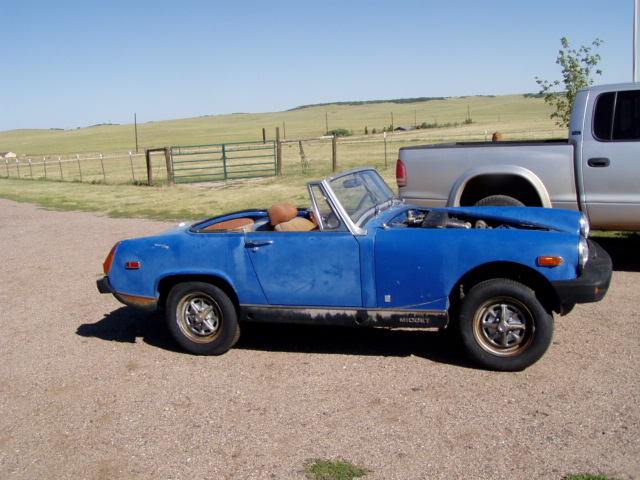
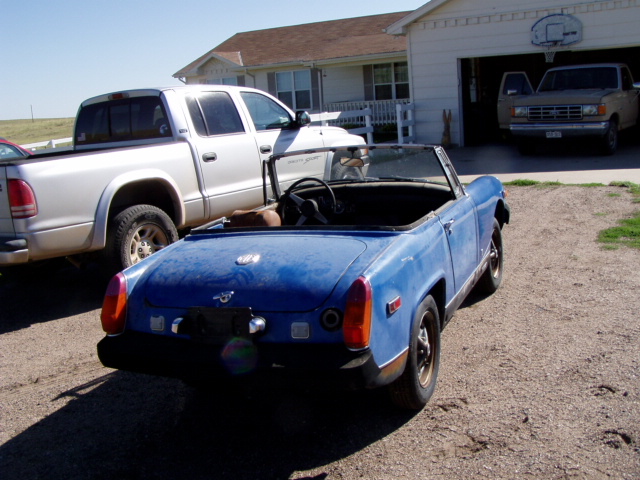
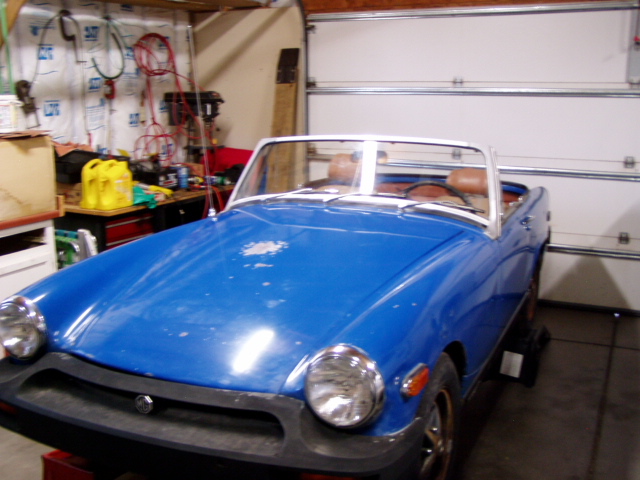
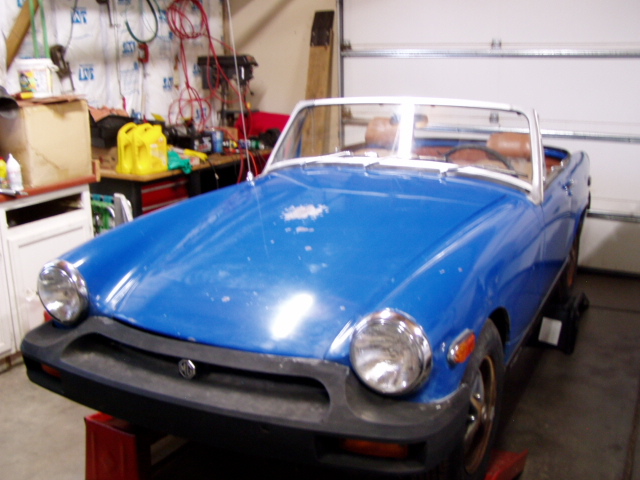
 I was on Craigslist the other day and came across this diamond in the rough. A 1976 MG Midget just
like the old days! The main difference is it is now 35 years old with the inside all gutted out and the
trunk full of pieces parts. It has not been run in 10 years, the clutch is out and no brakes.
The car is in good shape for being that old, very little rust and not banged up too bad.
I asked my wife if she cared if I bought this.
Her only comment was it is your money! That said I was sure that was a green light to go for it.
I was on Craigslist the other day and came across this diamond in the rough. A 1976 MG Midget just
like the old days! The main difference is it is now 35 years old with the inside all gutted out and the
trunk full of pieces parts. It has not been run in 10 years, the clutch is out and no brakes.
The car is in good shape for being that old, very little rust and not banged up too bad.
I asked my wife if she cared if I bought this.
Her only comment was it is your money! That said I was sure that was a green light to go for it.
 They were
wanting a 1000 dollars for it I offered them 500 after looking at it. I gave him my # and told him if he wanted
to sell it for that I was interested. He called a couple days later and said he would let me have it for 600.
I agreed and took my neighbor and his trailer over to pick it up that next Sunday.
We pushed the car on the trailer and tied it all down. The owner and his boy spent a couple minutes regretting
letting it go. They were just in over their heads on this one. At that time I was thinking maybe I was in over
my head also. All the problems it had were the same problems I had with mine in the 5 years I owned it. I was
not in new territory, after all it was like riding a bicycle right? When I got it home I immediately started
going over it looking for problems that I should have looked at before I bought it. The longer I had to think
about the project the more things I remembered that went wrong with mine 30 years before.
They were
wanting a 1000 dollars for it I offered them 500 after looking at it. I gave him my # and told him if he wanted
to sell it for that I was interested. He called a couple days later and said he would let me have it for 600.
I agreed and took my neighbor and his trailer over to pick it up that next Sunday.
We pushed the car on the trailer and tied it all down. The owner and his boy spent a couple minutes regretting
letting it go. They were just in over their heads on this one. At that time I was thinking maybe I was in over
my head also. All the problems it had were the same problems I had with mine in the 5 years I owned it. I was
not in new territory, after all it was like riding a bicycle right? When I got it home I immediately started
going over it looking for problems that I should have looked at before I bought it. The longer I had to think
about the project the more things I remembered that went wrong with mine 30 years before.
 That said I created my first of many lists of parts needed. I then removed the parts from the inside of
the car and from the trunk. I laid all these parts on the floor of the barn attic. I was taking stock of
what parts I had and what parts were missing. I then pushed the car in the barn to get this project rolling!
The barn has a dirt floor so this made it pretty dirty to work under the car. To change the clutch in an MG
Midget you have to pull the engine. I know what all you auto mechanics are saying! Why in heck would you pull
an engine to replace a clutch! Well I will just say you have to understand this is a British car.
Some British ingenuity is brilliant, some is not so brilliant. To strengthen the car frame they have boxed in
the engine and transmission. The only way to pull the transmission is with the engine out of the car. I had
replaced mine 2 times in the 5 years I owned. The original throw out bearing was carbon. How long can a carbon disk
spinning against a steel pressure plate last? That depends on what you do with your foot when at a stop sign or stop light!
If you put the car in Neutral and take your foot off the clutch pedal you will get 12,000 miles out of it. If you
keep the clutch pedal pushed in when stopped you will only get 8,000 miles out of the clutch. The British only drove
these things once a month.
That said I created my first of many lists of parts needed. I then removed the parts from the inside of
the car and from the trunk. I laid all these parts on the floor of the barn attic. I was taking stock of
what parts I had and what parts were missing. I then pushed the car in the barn to get this project rolling!
The barn has a dirt floor so this made it pretty dirty to work under the car. To change the clutch in an MG
Midget you have to pull the engine. I know what all you auto mechanics are saying! Why in heck would you pull
an engine to replace a clutch! Well I will just say you have to understand this is a British car.
Some British ingenuity is brilliant, some is not so brilliant. To strengthen the car frame they have boxed in
the engine and transmission. The only way to pull the transmission is with the engine out of the car. I had
replaced mine 2 times in the 5 years I owned. The original throw out bearing was carbon. How long can a carbon disk
spinning against a steel pressure plate last? That depends on what you do with your foot when at a stop sign or stop light!
If you put the car in Neutral and take your foot off the clutch pedal you will get 12,000 miles out of it. If you
keep the clutch pedal pushed in when stopped you will only get 8,000 miles out of the clutch. The British only drove
these things once a month.
 The first thing I noticed on this project was the lack of screws. All of the things they removed the screws and
bolts from were no where to be found. So some where there must have been another box of screws and bolts. For this reason
I must have made 30 trips to Ace Hardware buying bolts and screws and washers and nuts! I was fortunate to find
two great British car parts web sites Moss Motors, Victoria British.
They stock
all the hard to get parts and they ship the same day. All of these parts are original parts made in
Britain. And even better
than that they are very inexpensive.
The first thing I noticed on this project was the lack of screws. All of the things they removed the screws and
bolts from were no where to be found. So some where there must have been another box of screws and bolts. For this reason
I must have made 30 trips to Ace Hardware buying bolts and screws and washers and nuts! I was fortunate to find
two great British car parts web sites Moss Motors, Victoria British.
They stock
all the hard to get parts and they ship the same day. All of these parts are original parts made in
Britain. And even better
than that they are very inexpensive.
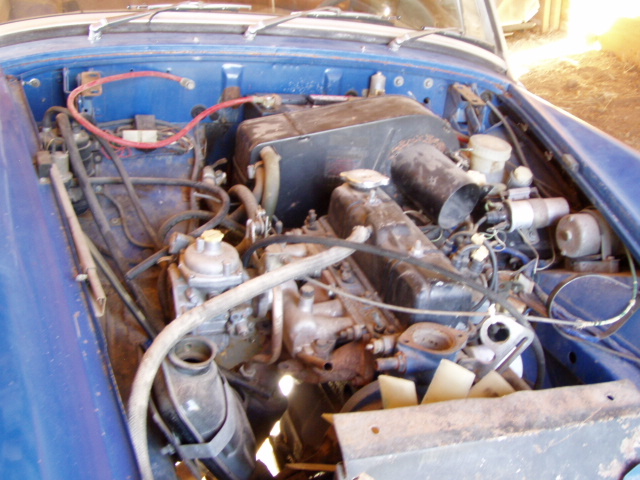
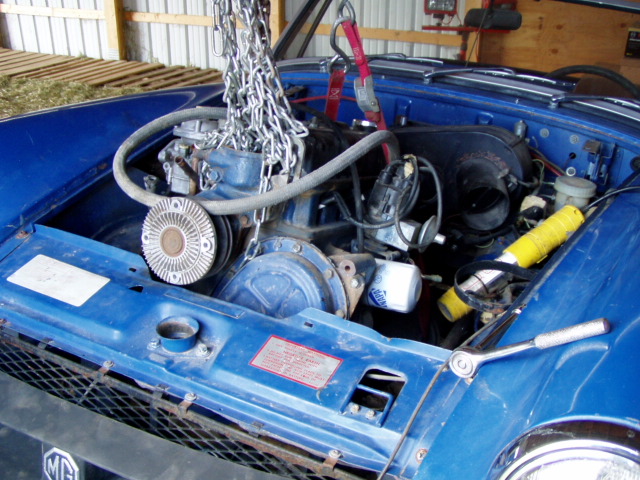
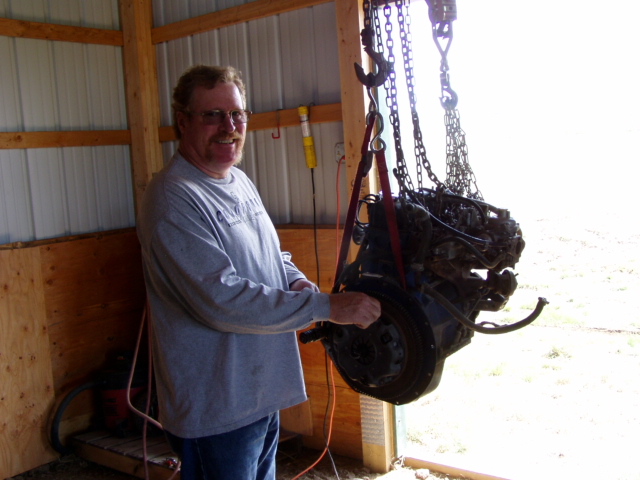
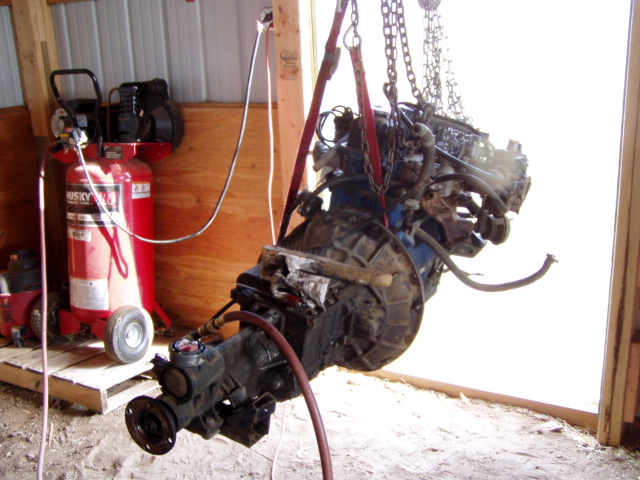
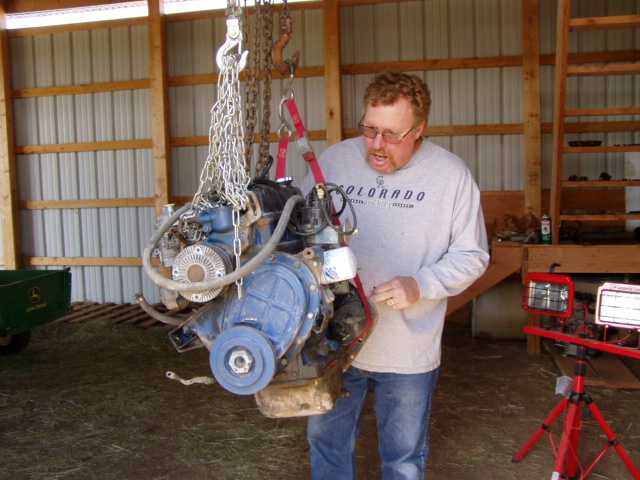 I am now setting next to the car thinking I am a fat cat on a roll. If I only knew that the Stromberg Zenith CD4 150
side draft carburetor lies ahead. I pushed the car sideways in the barn and hung a big chain from the rafters to pull
the engine. Using my wench that I pull fences tight to yank the engine out of the car made the job a cake walk.
Oh what will a cowboy think of next! I then pushed the car out from under the engine and moved it out of the way.
I had already made the decision to move the car into the garage to put the engine back in and finish the project.
I was tired of being like Pig Pen on Charlie Brown, every time I moved the dust just made a cloud around me. Once
the engine and transmission were pulled removing the transmission was just a matter of a few bolts.
I am now setting next to the car thinking I am a fat cat on a roll. If I only knew that the Stromberg Zenith CD4 150
side draft carburetor lies ahead. I pushed the car sideways in the barn and hung a big chain from the rafters to pull
the engine. Using my wench that I pull fences tight to yank the engine out of the car made the job a cake walk.
Oh what will a cowboy think of next! I then pushed the car out from under the engine and moved it out of the way.
I had already made the decision to move the car into the garage to put the engine back in and finish the project.
I was tired of being like Pig Pen on Charlie Brown, every time I moved the dust just made a cloud around me. Once
the engine and transmission were pulled removing the transmission was just a matter of a few bolts.
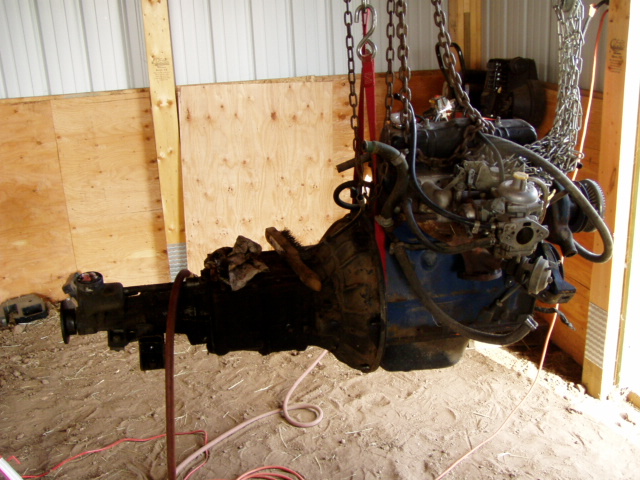 I pulled the pressure plate and clutch disk off cleaned
the fly wheel and was ready to put in the new parts. Immediately I saw the parts I had were the wrong size. I made
the trip back to Colorado Springs to get the correct parts. This trip was one of many to the auto parts house. And of
course the parts had to be ordered and kill another 4 days.
I pulled the pressure plate and clutch disk off cleaned
the fly wheel and was ready to put in the new parts. Immediately I saw the parts I had were the wrong size. I made
the trip back to Colorado Springs to get the correct parts. This trip was one of many to the auto parts house. And of
course the parts had to be ordered and kill another 4 days.
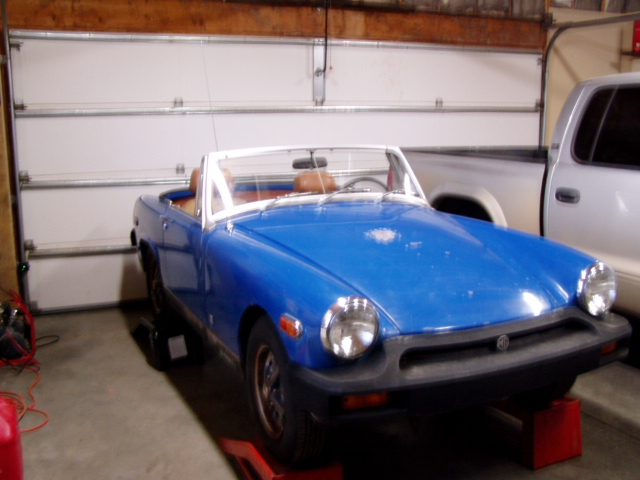
 I install the correct clutch assembly and installed the 3 missing bolts on the bell housing. I am
ready to put the engine back into the car. I will have to move my chain and wench to the garage rafters. I use my John
Deere tractor and wagon to move the engine under the newly installed lift in the garage. One thing nice about this car
it only weighs 1800 pounds and can easily be moved around. By now I have consumed about 2 weeks or so and Lewis has
been calling me every day for 5 days wanting to know when we are taking the midget for it's maiden
voyage. By now he
is tired of hearing the age old expression "maybe tomorrow". I get the engine,
transmission, and drive shaft all bolted
in and secured. After toping off the tranmsission with fluid I am ready to tackle the clutch hydraulics.
I install the correct clutch assembly and installed the 3 missing bolts on the bell housing. I am
ready to put the engine back into the car. I will have to move my chain and wench to the garage rafters. I use my John
Deere tractor and wagon to move the engine under the newly installed lift in the garage. One thing nice about this car
it only weighs 1800 pounds and can easily be moved around. By now I have consumed about 2 weeks or so and Lewis has
been calling me every day for 5 days wanting to know when we are taking the midget for it's maiden
voyage. By now he
is tired of hearing the age old expression "maybe tomorrow". I get the engine,
transmission, and drive shaft all bolted
in and secured. After toping off the tranmsission with fluid I am ready to tackle the clutch hydraulics.
 I install a clutch master cylinder rebuild kit and replace the clutch slave
cylinder with a new one. The rebuild parts for the clutch slave were back ordered. I start bleeding the fluid in the
clutch cylinder and than have an immediate serious leak. I started looking that over to see the hose is cracked so I
am off to make another order from Moss Motors parts! I also repaired the shorted heater blower motor wires. That short
burned out the blower motor switch so that was added to the order. I also cleaned out the heater compartment and blew
the dirt and dust out of that area. I am going to need heat now by the time I get this project done. Fall is rapidly
setting in the Rockies.
I install a clutch master cylinder rebuild kit and replace the clutch slave
cylinder with a new one. The rebuild parts for the clutch slave were back ordered. I start bleeding the fluid in the
clutch cylinder and than have an immediate serious leak. I started looking that over to see the hose is cracked so I
am off to make another order from Moss Motors parts! I also repaired the shorted heater blower motor wires. That short
burned out the blower motor switch so that was added to the order. I also cleaned out the heater compartment and blew
the dirt and dust out of that area. I am going to need heat now by the time I get this project done. Fall is rapidly
setting in the Rockies.
 These parts arrive about a week later and I am now almost 4 weeks and 10 calls by Lewis into the project. They did not
build Rome over night, nor will I have this running in the 2 weeks I originally told myself I would. Every time I place
a new parts order for broken parts, I also order parts that will make the car look better. From leaning on the fender
to fix the car I am starting to see paint that shines very brightly. So while waiting on parts I pull out an old bottle
of windshield wax from my airplanes. After waxing this old girl she is starting to look like a real British sports car.
Another week later and 5 more calls from Lewis I have the new clutch hose installed and bled. Oh if life could only
be this easy we would all be sitting on a beach some where in the tropics drinking Mia Tias and singing a great old
Jimmy Buffet tune. Just when I thought it was safe to go out in the garage that old Stromberg carb is next.
These parts arrive about a week later and I am now almost 4 weeks and 10 calls by Lewis into the project. They did not
build Rome over night, nor will I have this running in the 2 weeks I originally told myself I would. Every time I place
a new parts order for broken parts, I also order parts that will make the car look better. From leaning on the fender
to fix the car I am starting to see paint that shines very brightly. So while waiting on parts I pull out an old bottle
of windshield wax from my airplanes. After waxing this old girl she is starting to look like a real British sports car.
Another week later and 5 more calls from Lewis I have the new clutch hose installed and bled. Oh if life could only
be this easy we would all be sitting on a beach some where in the tropics drinking Mia Tias and singing a great old
Jimmy Buffet tune. Just when I thought it was safe to go out in the garage that old Stromberg carb is next.
 I now understand why everyone is putting down draft Weber Carburetors on there MG Midget. In the trunk I found a set of dual
Stromberg Carbs. Now that was the original United Kingdom setup. They had no
emissions to meet so the only thing that
mattered was how fast can we make this thing go. No I am not going that route. I had way to much trouble getting 1 carb
working. The engine would not run unless I put a hose or screwdriver in the carb damper to hold it open. Once it was
open for while I could remove the tool and it would run. This took me another week to figure out I had a choke not
working. After a couple days searching the web I found a good article on making the Stromberg Carb run. It specifically
covered recalibrating the choke. After years of use the Choke spring stretches and you no longer have an accurate choke.
I was to the point where I was going to follow every one else's foot steps and change the choke to a manual choke. Pull the
handle let the car warm up than push the handle back in. Problem solved. But I would not sleep at night doing that. I
have to make it work or I will never sleep.
I now understand why everyone is putting down draft Weber Carburetors on there MG Midget. In the trunk I found a set of dual
Stromberg Carbs. Now that was the original United Kingdom setup. They had no
emissions to meet so the only thing that
mattered was how fast can we make this thing go. No I am not going that route. I had way to much trouble getting 1 carb
working. The engine would not run unless I put a hose or screwdriver in the carb damper to hold it open. Once it was
open for while I could remove the tool and it would run. This took me another week to figure out I had a choke not
working. After a couple days searching the web I found a good article on making the Stromberg Carb run. It specifically
covered recalibrating the choke. After years of use the Choke spring stretches and you no longer have an accurate choke.
I was to the point where I was going to follow every one else's foot steps and change the choke to a manual choke. Pull the
handle let the car warm up than push the handle back in. Problem solved. But I would not sleep at night doing that. I
have to make it work or I will never sleep.
 I recalibrate the choke scribing new marks on the outer case when the choke is hot. I reassemble readjust and jump in the car
turn the key and she fires right up. Now that was a piece of cake. She is purring like a brand new blender you got for Christmas.
After it starts to warm up the engine is starting to idle very fast. I am back on the web rereading the article I found.
You got to adjust this that and the other thing at certain times. OK now it is time to print out this article. That done I am
back under the hood tweaking this and tweaking that. I am finding very quickly that when you tweak a screw on that
Stromberg you should only move it a 1/4 of a turn. I wished this thing was a single piston Motorcycle carb. You just set a couple
screws at a setting you have used for the last 20 years and tweak an 1/8 to a 1/4 turn from there and it always runs correctly.
I have spent a week on this carb where I would have only spent 5 minutes on a good old Japanese motorcycle carb. I am still
ecstatic that I have it running even though it is running rough. My bad language has improved vastly while on this project.
I am starting to see some light at the end of the tunnel. I only wished I knew 3 weeks ago what I know now. My plan to
drive this in some fall warm weather is all but gone now. We are expecting cold and snow this weekend. In Colorado once the
snow starts the warm days get shorter and further between. I am done for the day on this project I have to get the snowmobiles
ready to roll for this weekend. Sayonara little girl I will back on this project the weekend after next.
I recalibrate the choke scribing new marks on the outer case when the choke is hot. I reassemble readjust and jump in the car
turn the key and she fires right up. Now that was a piece of cake. She is purring like a brand new blender you got for Christmas.
After it starts to warm up the engine is starting to idle very fast. I am back on the web rereading the article I found.
You got to adjust this that and the other thing at certain times. OK now it is time to print out this article. That done I am
back under the hood tweaking this and tweaking that. I am finding very quickly that when you tweak a screw on that
Stromberg you should only move it a 1/4 of a turn. I wished this thing was a single piston Motorcycle carb. You just set a couple
screws at a setting you have used for the last 20 years and tweak an 1/8 to a 1/4 turn from there and it always runs correctly.
I have spent a week on this carb where I would have only spent 5 minutes on a good old Japanese motorcycle carb. I am still
ecstatic that I have it running even though it is running rough. My bad language has improved vastly while on this project.
I am starting to see some light at the end of the tunnel. I only wished I knew 3 weeks ago what I know now. My plan to
drive this in some fall warm weather is all but gone now. We are expecting cold and snow this weekend. In Colorado once the
snow starts the warm days get shorter and further between. I am done for the day on this project I have to get the snowmobiles
ready to roll for this weekend. Sayonara little girl I will back on this project the weekend after next.
 This weekends project involves pulling the gas tank and attempting to flush it out. The smell coming from the engine when
running is unbearable. You know there is some thing wrong when you pull the gas cap off. It smells like the stuff you use to
clean your paint brushes in. The fuel gage is also not working. I remove 6 screws and the tank is on the ground after I carefully
removed the fuel line and gas gage wires. I pull the gas gage sensor and immediately see the issue with it. It is rusted
into about the 1/2 tank position. I wire brush around that and get it moving again. Now for the stinky gas tank. I put some
cleaner in it along with the small amount of gas that was already in it. I swish that around and dump it out. I have a bucket
full of gas and rust. I blow air thru it and attempt to brake loose the rust in the tank. It does not seem to be the tank metal
rusting. It is 35 years of funk pumped into it mixed with a lot of moisture. There was no gas cap on the car when I bought it.
I leave it set over night and the next morning I bang on the tank all over to knock loose the rust. I end up with about 1/3 of
a coffee can full of rust. I put it all back together and put some fresh gas in it. I pump that fresh gas thru the lines before
I connect the fuel line to the carb. I do not want any of this old gas in my newly adjusted carb. I restart the engine and it
runs better and smells better. I am now starting to put back the interior that was all removed by the previous owners. I put
the side upholstery in and the side panels. I also put in the passengers door panel which is in very bad shape. The
interior
will be a spring project to get me in the mood when It is starting to warm up in Colorado.
This weekends project involves pulling the gas tank and attempting to flush it out. The smell coming from the engine when
running is unbearable. You know there is some thing wrong when you pull the gas cap off. It smells like the stuff you use to
clean your paint brushes in. The fuel gage is also not working. I remove 6 screws and the tank is on the ground after I carefully
removed the fuel line and gas gage wires. I pull the gas gage sensor and immediately see the issue with it. It is rusted
into about the 1/2 tank position. I wire brush around that and get it moving again. Now for the stinky gas tank. I put some
cleaner in it along with the small amount of gas that was already in it. I swish that around and dump it out. I have a bucket
full of gas and rust. I blow air thru it and attempt to brake loose the rust in the tank. It does not seem to be the tank metal
rusting. It is 35 years of funk pumped into it mixed with a lot of moisture. There was no gas cap on the car when I bought it.
I leave it set over night and the next morning I bang on the tank all over to knock loose the rust. I end up with about 1/3 of
a coffee can full of rust. I put it all back together and put some fresh gas in it. I pump that fresh gas thru the lines before
I connect the fuel line to the carb. I do not want any of this old gas in my newly adjusted carb. I restart the engine and it
runs better and smells better. I am now starting to put back the interior that was all removed by the previous owners. I put
the side upholstery in and the side panels. I also put in the passengers door panel which is in very bad shape. The
interior
will be a spring project to get me in the mood when It is starting to warm up in Colorado.
 It is time to call Lewis and see if he is ready to roll. I call him and he is heading to southern Colorado for the day. He is
now on the schedule for Sunday am. I am super glad this car has tow hooks on the front and back. If it dies we can just call
home and get some one to bring the pickup truck and a tow rope for us. I do not wait on Lewis though I load up me and my little
poodle Abby and we take the car out on the back roads and turn arounds of rural Colorado. After 7 weeks of terror I finally put
19 miles on it for the day. That is 19 more miles than this thing has run in 10 years. This is only the beginning of the work
on it. All the rubber parts on it are brittle and cracked. I still have many hours of work left on my Midget. But at least now
it can be driven. I have applied for personalized license plates "Midget" so until those are either rejected or accepted it
will set in the barn waiting on license plates and insurance.
It is time to call Lewis and see if he is ready to roll. I call him and he is heading to southern Colorado for the day. He is
now on the schedule for Sunday am. I am super glad this car has tow hooks on the front and back. If it dies we can just call
home and get some one to bring the pickup truck and a tow rope for us. I do not wait on Lewis though I load up me and my little
poodle Abby and we take the car out on the back roads and turn arounds of rural Colorado. After 7 weeks of terror I finally put
19 miles on it for the day. That is 19 more miles than this thing has run in 10 years. This is only the beginning of the work
on it. All the rubber parts on it are brittle and cracked. I still have many hours of work left on my Midget. But at least now
it can be driven. I have applied for personalized license plates "Midget" so until those are either rejected or accepted it
will set in the barn waiting on license plates and insurance.
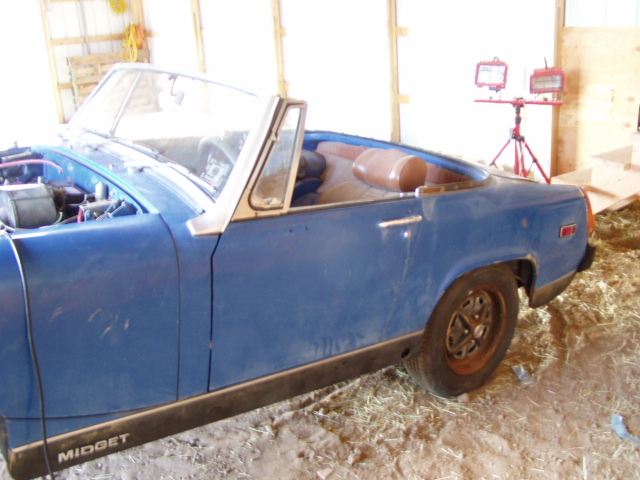
 I am putting the hood back on today, which on a car setting this low to the ground is a very easy job. I had the exhaust system
that was bent repaired and I reinstalled that with new brackets and bolts. I am down to just giving this little puppy a complete
tune up. That would involve points, plugs, wires, and rotor cap. I am hoping it will still get 40 miles to a gallon of gas. I am
doubting that with all the additives they put in gas now it will still get 40 mph. I attempted to install the new sun visors only
to find the threads are to short. An email to the parts house and return of the wrong ones, I have the correct UK ones on order.
On a convertible the sun visors are a must to keep the wind off your long curly hair. I guess maybe replacing them is a waste of
money for me! My hair has not been long and curly since high school.
I am putting the hood back on today, which on a car setting this low to the ground is a very easy job. I had the exhaust system
that was bent repaired and I reinstalled that with new brackets and bolts. I am down to just giving this little puppy a complete
tune up. That would involve points, plugs, wires, and rotor cap. I am hoping it will still get 40 miles to a gallon of gas. I am
doubting that with all the additives they put in gas now it will still get 40 mph. I attempted to install the new sun visors only
to find the threads are to short. An email to the parts house and return of the wrong ones, I have the correct UK ones on order.
On a convertible the sun visors are a must to keep the wind off your long curly hair. I guess maybe replacing them is a waste of
money for me! My hair has not been long and curly since high school.
 This weekend I am putting the Midget back in the garage to give the suspension a going over. I will attempt to grease the front
suspension parts, this will give me a good idea of their condition. If they take grease and are not sloppy loose than I will not
need to replace them. If they do not take grease than the parts will wear out quickly and have to be replaced. The rubber boots
that hold the grease in the ball joints are cracked and about ready to fall off. The ball joints for that reason will have to
be replaced. They will last a while before the water gets in and wears out the ball joint. Once I put the Midget up on the ramps
I start looking for the grease Zerk fittings and immediately notice one is missing. I grease top and bottom on the right side.
This weekend I am putting the Midget back in the garage to give the suspension a going over. I will attempt to grease the front
suspension parts, this will give me a good idea of their condition. If they take grease and are not sloppy loose than I will not
need to replace them. If they do not take grease than the parts will wear out quickly and have to be replaced. The rubber boots
that hold the grease in the ball joints are cracked and about ready to fall off. The ball joints for that reason will have to
be replaced. They will last a while before the water gets in and wears out the ball joint. Once I put the Midget up on the ramps
I start looking for the grease Zerk fittings and immediately notice one is missing. I grease top and bottom on the right side.
 There is no fitting on the ball joints it looks like they are both broken off. But the ball joints are in such bad shape they
will have to be replaced. I make a mental note to add ball joints for both sides on my next parts order. I grease the upper
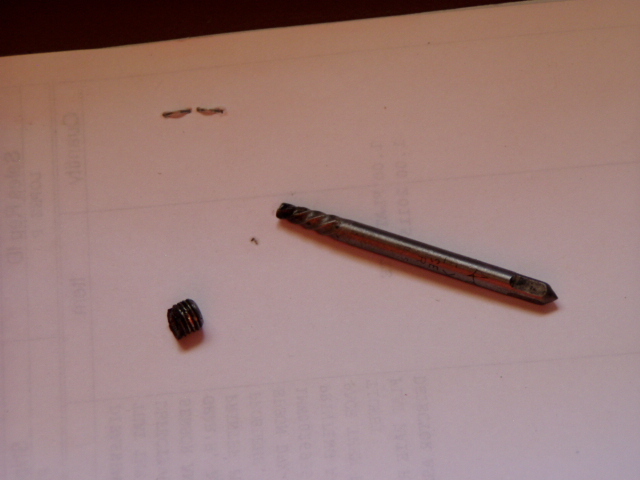
fitting on the drivers side and decide I need to find my easy outs to remove the broken fitting on the bottom one. An easy
out is a backwards drill bit looking thing. It has backwards threads so you can screw them into broken bolts by drilling a
hole into the bolt and using the easy out to back the bolt out. In the case of the zerk grease fitting it already has a
hole thru it to allow the grease to go inside. I finally find my easy out set and the one I need is missing. That is probably
because I used it 30 years ago on my MG Midget and broke it off.
There is no fitting on the ball joints it looks like they are both broken off. But the ball joints are in such bad shape they
will have to be replaced. I make a mental note to add ball joints for both sides on my next parts order. I grease the upper
fitting on the drivers side and decide I need to find my easy outs to remove the broken fitting on the bottom one. An easy
out is a backwards drill bit looking thing. It has backwards threads so you can screw them into broken bolts by drilling a
hole into the bolt and using the easy out to back the bolt out. In the case of the zerk grease fitting it already has a
hole thru it to allow the grease to go inside. I finally find my easy out set and the one I need is missing. That is probably
because I used it 30 years ago on my MG Midget and broke it off.
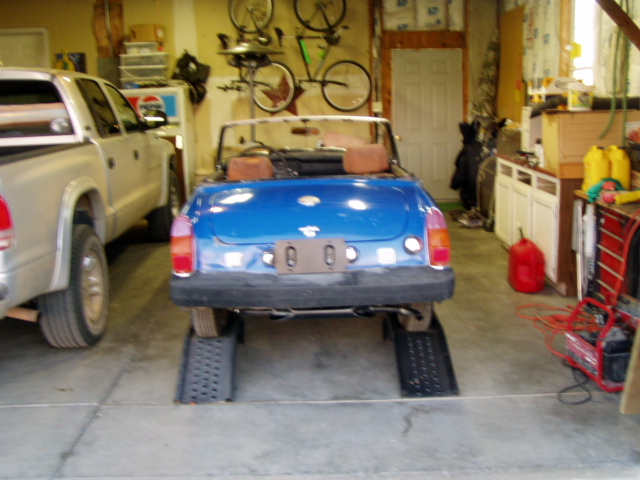 I grind the tip off the next smaller size so it fits into the opening of the old zerk fitting and back the threads out. I have a
bunch of new ones and install a new one and grease that fitting. It looks like the suspension on the front is solid and has been
maintained properly. A couple of ball joints and this thing will be ready to head south. I check the antifreeze to make sure
none of my hoses have leaked. I then pull it out of the garage and take this last shot of it with the hard top on. It is now
time to put it back in the barn with it's old buddy the Congo Clipper II.
I grind the tip off the next smaller size so it fits into the opening of the old zerk fitting and back the threads out. I have a
bunch of new ones and install a new one and grease that fitting. It looks like the suspension on the front is solid and has been
maintained properly. A couple of ball joints and this thing will be ready to head south. I check the antifreeze to make sure
none of my hoses have leaked. I then pull it out of the garage and take this last shot of it with the hard top on. It is now
time to put it back in the barn with it's old buddy the Congo Clipper II.
